

Common RV Storage Mistakes Michigan Owners Make (And How to Avoid Them)
Most RV storage damage in Michigan is self-inflicted not because owners are careless, but because a handful of preventable mistakes made in October and November compound silently for five or six months and surface as repair bills in April. Plumbing that freezes and cracks, roofs that develop leaks under snow, batteries that won’t hold a charge, and interiors colonized by mold or rodents all share one thing in common: they were avoidable.
This guide focuses on the specific mistakes Michigan owners make and why they’re more costly here than in most other states.
Why RV Storage Mistakes Are More Expensive in Michigan
Michigan’s storage season isn’t a mild three-month pause. Most RV owners in the Lower Peninsula store their units from late October through mid-April roughly 170 to 190 days. Owners in the Upper Peninsula often push that to 200 days or longer. That duration alone amplifies every storage mistake. A small roof crack that would be caught and repaired in a state with a six-week storage season becomes a full delamination panel in Michigan because water has six months to work its way through the wall substrate.
Freeze-thaw cycles are the primary mechanical threat. Michigan doesn’t simply get cold and stay cold. During a typical southern Michigan winter, temperatures will cross the 32°F threshold dozens of times. Each cycle expands and contracts water trapped in plumbing lines, sealants, slide-out gaskets, and roof membranes. Materials that could survive a single deep freeze often fail under 40 cycles of repeated stress.
Great Lakes humidity compounds every moisture-related mistake. Michigan’s proximity to Lakes Michigan, Huron, Erie, and Superior keeps relative humidity elevated even in winter. An RV stored outdoors or in an unheated pole barn isn’t in dry winter air; it’s in air that can range from 60 to 80 percent relative humidity on a typical January day in west Michigan. That moisture finds every gap you didn’t seal and every material you left unsealed inside.
Snow load is a structural consideration most owners don’t quantify. Grand Rapids, Traverse City, the Thumb, and essentially the entire Upper Peninsula are in zones where seasonal snow accumulation can exceed 80 to 150 inches. A flat or low-slope RV roof wasn’t engineered to bear repeated snow accumulation. A single 18-inch snowfall can put 20 to 25 pounds per square foot on an RV roof, and repeated cycles of accumulation, partial melting, and refreezing turn that into ice load which is heavier and harder to remove without damaging the membrane.
1: Skipping Winterization Entirely
This is the most expensive mistake and the most common among first-year RV owners. The reasoning is almost always the same: it’s early November, the weather hasn’t been consistently cold yet, the owner expects to use the RV one more time, or they plan to have it “done soon” and run out of time.
A single night at 20°F with water sitting in an un-winterized plumbing system can crack a water heater tank, split PEX supply lines, rupture low-point drain connections, crack the toilet bowl or foot pedal valve, and burst the city water inlet fitting. Any one of those failures costs $200 to $800 individually. A full plumbing system rebuild after catastrophic freeze damage typically runs $2,500 to $6,000 or more depending on RV size and accessibility.
The critical misunderstanding is that damage doesn’t require sustained cold. Water expands approximately 9 percent when it freezes. That expansion generates internal pressure that exceeds 2,000 PSI far beyond what any RV plumbing component is rated to withstand. A single overnight freeze is sufficient to crack components that will then leak invisibly until spring.
What to do instead: Winterize before the first forecast low below 32°F. In Michigan, that window closes by mid-October in the UP and by early-to-mid November in the southern Lower Peninsula. If you’re uncertain whether you’ll use the RV again, winterize anyway. De-winterizing costs under $30 in materials and less than an hour of labor.
2: Leaving Water in the Plumbing System After Incomplete Winterization
Partial winterization meaning the owner ran antifreeze through most of the system but missed critical components is nearly as damaging as skipping winterization entirely. These are the locations where water reliably survives incomplete procedures:
Water heater: The water heater tank holds 6 to 10 gallons and must be bypassed before running antifreeze through the lines, or drained completely using the drain plug and anode rod port. Owners who skip the bypass allow antifreeze to dilute inside a full tank without ever protecting it. A cracked water heater tank costs $300 to $700 for parts alone on most Class A and Class C units.
Low-point drains: Every RV has low-point drain valves, typically red and blue handles mounted under the coach designed to let water out of the supply lines. Many owners open these but don’t clear the lines with compressed air or antifreeze afterward, leaving standing water in line segments that don’t drain by gravity. Even 2 to 3 ounces of trapped water in a PEX elbow can generate enough expansion pressure to split a fitting. When blowing out lines with compressed air, set the regulator to 30-40 PSI maximum. Higher pressure can blow out fittings and damage Schrader valve cores at the city water inlet; lower pressure won’t fully evacuate water from horizontal runs and traps.
Ice maker and washing machine supply lines: These are the most commonly missed components in a DIY winterization. Slide-in washing machines have internal pump housings that retain water. Refrigerator ice makers have thin supply lines that freeze readily. A missed ice maker line is a common source of the “mystery puddle” owners find inside their coach in spring.
Toilet supply valve: The foot pedal valve in an RV toilet contains a small rubber seal and water chamber that freezes and cracks in a way that’s only apparent when water begins trickling continuously through the toilet in spring.
What to do instead: Follow a written winterization procedure that accounts for every water-holding component in your specific floorplan. Blow out lines with compressed air at 30–40 PSI before running antifreeze air evacuation removes bulk water, antifreeze protects residual moisture. If you’re uncertain whether a component was covered, check it before assuming it was.
3: Assuming a Tarp Is Adequate Protection
Tarps sold at big-box stores and even RV covers marketed as “weatherproof” create a specific damage pattern that owners often don’t recognize until they pull the cover in spring.
The mechanism is this: temperature differentials between daytime and nighttime cause moisture-laden air under the cover to condense against the cooler RV surface. A tarp that traps air against the roof, sidewalls, and slide-out toppers creates a sustained humid microclimate for the entire storage season. This drives mold growth inside wall cavities where moisture migrates through membrane seams, accelerates oxidation of aluminum components, and softens EPDM roof membranes in a way that makes them more susceptible to tearing.
Tarps also abrade: Wind movement causes the tarp to shift and rub against the RV’s surface. On painted fiberglass sidewalls, this produces micro-scratching that compounds over months and eventually dulls the finish permanently. On EPDM or TPO roof membranes, repeated tarp abrasion wears through the UV-protective coating layer.
The third problem is structural load: A poorly fitted tarp that pools water or holds snow concentrates weight in areas not designed to bear it specifically over slideout toppers and at the edges of roof-mounted A/C units.
What to do instead: If outdoor storage is your only option, use a purpose-built, breathable RV cover with integrated air vents, soft inner liner material, and multiple attachment points that prevent movement in wind. Alternatively, a well-ventilated pole barn or enclosed storage eliminates the tarp problem entirely while still providing protection from UV, precipitation, and wind.
4: Ignoring Batteries for the Entire Storage Period
Batteries are the component most owners intend to address and least often actually manage correctly. The consequence is arriving in April with batteries that won’t accept a charge and need immediate replacement adding $150 to $800 to the spring startup cost before you’ve even taken the RV anywhere.
Lead-acid batteries (flooded and AGM) self-discharge at a rate of 5 to 15 percent per month at room temperature. In a cold Michigan storage environment, discharge rates drop somewhat, but the deeper problem is sulfation: when a lead-acid battery remains in a discharged or partially discharged state for extended periods, lead sulfate crystals form on the plates in a way that permanently reduces capacity. A battery discharged below 12.0 volts for more than a few weeks is likely sulfated. Below 11.5 volts, it’s usually unrecoverable.
An additional risk specific to Michigan: a discharged lead-acid battery can freeze. A fully charged flooded battery freezes at approximately -80°F. A fully discharged one freezes at 32°F. That means an outdoor-stored, neglected battery is vulnerable to freezing for essentially the entire storage season.
Lithium (LiFePO4) batteries are more tolerant of low states of charge but have their own Michigan-specific risk: most lithium batteries have built-in Battery Management Systems (BMS) that shut down charging below 32°F to prevent lithium plating. If your lithium bank drains to the BMS cutoff point in a cold storage environment, the solar or shore power input will not be accepted until the cells warm above freezing meaning the battery stays depleted until you intervene.
What to do instead: Disconnect and remove house batteries, store them in a conditioned space, and connect them to a quality three-stage or “smart” battery maintainer (NOCO Genius and Battery Tender Plus are common choices for lead-acid; verify lithium compatibility before connecting any maintainer to LiFePO4 cells). If removal isn’t practical, a solar maintainer can offset discharge on lead-acid batteries in outdoor storage, though it won’t suffice in low-light Michigan winters without supplemental charging.
5: Neglecting Tire Care During Storage
Tires parked in one position for five-plus months develop flat spots deformations in the contact patch caused by the weight of the RV and the cold-temperature stiffening of the rubber compound. In mild climates with shorter storage seasons, flat spots often self-correct after a few miles of driving. In Michigan, where tires can sit stationary through repeated temperature swings for up to six months, flat spotting can become permanent, creating a vibration that won’t go away and compromising the structural integrity of the tire carcass.
Pressure loss accelerates the problem: Tires lose approximately 1 to 2 PSI per month at stable temperatures, and faster during cold snaps. An under-inflated tire bears its load over a smaller sidewall contact zone, which is precisely how permanent flat spotting develops.
UV exposure during winter storage is underestimated: UV radiation is present year-round and degrades the sidewall antiozonants in rubber. Winter sun at low angles can actually concentrate UV on tire sidewalls in outdoor storage. Sidewall crazing the network of fine cracks that indicates ozone and UV damage develops faster on tires that are both UV-exposed and temperature-stressed.
What to do instead: Before storage, inflate tires to the higher end of the manufacturer’s recommended operating range typically 10 PSI above the placard minimum. Avoid inflating to the maximum sidewall rating, which is a structural pressure limit rather than a recommended operating pressure; running at maximum sidewall pressure on a lightly loaded axle stresses the carcass unnecessarily. Place tires on interlocking foam or plywood boards to reduce ground moisture wicking. Use tire covers if outdoors. For storage longer than 90 days, consider moving the RV forward or backward 6 to 12 inches every 30 days to change the contact patch position.
6: Failing to Inspect the Roof Before Storage
Storing an RV with an undetected roof defect is particularly costly in Michigan because the defect has a full season of precipitation, freeze-thaw cycling, and snow load to develop into a structural problem. A $15 tube of Dicor lap sealant applied in October can prevent a $4,000 delamination repair in April.
The places roof problems originate most often:
Lap sealant around penetrations: Every roof penetration vents, A/C units, antennas, solar panels, skylights are sealed with lap sealant or putty tape. These sealants are designed to remain flexible, but they age and crack. Michigan’s UV index and freeze-thaw stress accelerate cracking. A failed sealant bead around a roof vent allows water to enter the roof substrate with every rain event and snowmelt is a slow, continuous rain event.
EPDM seams at the roof edge: Where the roof membrane wraps over the edge and bonds to the sidewall, the adhesive bond can separate. This is often invisible from the ground and only found by walking on the roof and pressing on the edge membrane. Separated edge bonding is a direct water intrusion point that wets the sidewall substrate above the upper cabinet line exactly where delamination originates.
Slide-out toppers and their attachment points: The aluminum frames and fabric toppers over slide-outs develop small gaps at their mounting flanges over time. Water and debris accumulate in these channels, and Michigan winters leave ice in those gaps that mechanically widens them.
What to do instead: Walk the roof before storage every year. Use a soft-soled shoe. Press on the roof surface around every penetration to check for soft spots (sponginess indicates wet substrate). Inspect all sealant lines for cracking, lifting, or separation. Apply fresh Dicor 501LSW or compatible lap sealant over any questionable area. A 90-minute roof inspection and touch-up before storage is the highest-ROI maintenance task an RV owner can perform in Michigan.
7: Leaving Food and Moisture Sources Inside
Storing an RV with food in the cabinets, a full gray water tank, damp textiles, or unsealed organic materials creates two converging problems: mold growth and rodent attraction.
Mold doesn’t require visible liquid water to establish: Relative humidity above 60 percent sustained over days or weeks is sufficient. Food residue in cabinet corners, a damp dish towel, condensation moisture in a closed mattress, or residual gray tank odors all provide organic substrate that mold colonizes during storage. By spring, a minor oversight has become pervasive interior mold that requires professional remediation and may have penetrated foam cushion cores and subfloor material.
Sealed cans and bags still attract rodents because odor permeates packaging. This is not a minor risk in rural Michigan; it connects directly to the next mistake.
What to do instead: Remove every item of food without exception. Wipe down cabinet interiors. Dump and rinse the gray tank. Leave interior cabinet doors slightly open for air circulation. Place DampRid or rechargeable silica gel moisture absorbers throughout the interior in cabinets, in the bathroom, in the bedroom. Leave roof vents cracked (with their rain covers engaged) if rodent ingress through vents has been addressed.
8: Underestimating Rodent Problems in Rural Michigan
Mice, red squirrels, and occasionally chipmunks cause repair bills that surprise owners unfamiliar with Michigan’s rural and agricultural storage environment. Storage facilities near farm fields, woodlines, or open agricultural land common in mid-Michigan, the Thumb, and most of the Lower Peninsula’s interior are adjacent to some of the highest rodent pressure in the Midwest. Gaines County in west Michigan, Gratiot, Montcalm, Isabella, and Tuscola counties are all heavily agricultural areas where field mouse populations are substantial. When crops are harvested in fall, mice move toward structures.
Red squirrels, prevalent in northern Michigan and the UP, are a different threat category than mice. They’re more aggressive gnawers, cache food obsessively, and can gain entry through larger openings. A red squirrel that establishes a cache inside a stored motorhome will destroy insulation, ducting, and cabinetry material to create storage space.
Mice enter through gaps as small as a quarter inch. The most common entry points are: the engine bay and undercarriage cavities in motorhomes, slide-out underbelly gaps where the slide rail exits the coach body, fresh water inlet access doors, cable and wire pass-throughs in the underbelly, and exhaust port openings for the furnace and water heater. Rodents chew wiring harnesses because they must gnaw continuously to maintain tooth length; they don’t discriminate between foam insulation and wire insulation. Repairing rodent-chewed wiring in a Class A motorhome typically runs $1,500 to $4,000 because harnesses route through walls and under flooring.
What to do instead: Seal all identifiable entry points before storage using steel wool, copper mesh, or expanding foam with a steel mesh backer rodents chew through standard expanding foam readily. Place Fresh Cab or Grandpa Gus’s pouches throughout the interior and in the engine bay. Avoid ultrasonic repellents: the evidence for their effectiveness beyond the first few weeks is consistently poor. If storing in high-rodent-pressure locations, check the RV monthly rather than leaving it unattended for the full storage season.
9: Choosing Storage Based Only on Price
The true cost of RV storage is the monthly rate plus the incremental damage cost that results from storage conditions. An owner who saves $40 per month by choosing an outdoor lot over an enclosed facility is making a rational choice only if the incremental risk of outdoor storage costs less than $240 over a six-month storage season. In Michigan, that math almost always favors the higher-quality storage option.
Outdoor lot storage exposes the RV to UV degradation of the roof membrane, sidewall gelcoat, and tire sidewalls; freeze-thaw cycling without any thermal buffer; rodent pressure without the partial exclusion benefit that building walls provide; and wind-driven precipitation finding entry points that indoor storage would never expose.
The cost comparison also changes when you factor in what’s at risk. A used Class C motorhome worth $45,000 stored improperly for six years loses value faster than the same unit properly stored not because of mileage, but because the roof, sidewalls, and plumbing show the cumulative damage of poor storage conditions. A buyer’s inspection will find it, and the price reflects it.
The practical framework: Calculate 1 to 2 percent of your RV’s current value as the acceptable annual storage cost range. For a $50,000 RV, that’s $500 to $1,000 per year, or $85 to $165 per month, an amount that typically buys enclosed or covered storage in most Michigan markets. If you’re paying significantly less than that, ask what risk category you’re accepting.
10: Waiting Too Long to Prepare for Winter Storage
First hard freeze dates in Michigan are not abstract risks. The average first freeze in Grand Rapids is October 12. In Traverse City, October 9. In Sault Ste. Marie, September 28. Owners who plan to winterize “sometime in November” are operating without margin in the Upper Peninsula and with thin margin anywhere in the state.
The late-preparation problem compounds because of storage availability. Quality indoor and covered storage facilities in Michigan particularly near metro Detroit, Grand Rapids, Lansing, and popular recreation corridors like the Traverse City area and the Holland/Saugatuck coastline fill up by early to mid-October. Owners who know they’ll be storing for the winter should start researching storage options well before the first freeze arrives.Owners who wait until November often discover that their preferred facilities are full, forcing them into outdoor lot storage or a longer drive to a facility they didn’t research.
Winterization done under time pressure is winterization with skipped steps. The water heater bypass gets forgotten. The slide-out seals don’t get inspected. The roof doesn’t get walked. All of the mistakes described in this guide are more likely when the owner is working in cold weather and trying to beat the first snowfall.
What to do instead: Reserve storage in September. Use October 1 in the UP and October 15 in southern Michigan as hard deadlines, not guidelines. If you want one more fall camping trip, build it into a schedule that still ends with a completed winterization before the deadline.
11: Ignoring the Propane System
The propane system is the most consistently overlooked component at storage time, partly because LP gas itself doesn’t degrade like gasoline and partly because propane-related failures tend to develop slowly and aren’t discovered until spring.
The regulator is the most vulnerable component. Two-stage regulators have rubber diaphragms inside the regulator housing that are susceptible to moisture accumulation and freeze-thaw damage. In Michigan’s humid winters, condensation forms inside the regulator and can freeze against the diaphragm, causing it to stiffen, distort, or crack. A failed regulator won’t deliver the correct pressure to appliances in spring, causing weak furnace ignition, pilot outages, and erratic cooktop performance problems that are easily misdiagnosed as appliance failures.
Modern RV LP cylinders use OPD (Overfill Protection Device) valves with a service valve that should be fully closed for storage. Leaving it partially open allows trace LP vapor to escape and, in enclosed storage, creates a potential accumulation risk. This is also required by many storage facilities.
LP detector and CO detector units draw a small but continuous current from the 12V system. Over a 170-day storage season, these detectors can pull a lead-acid battery below the sulfation threshold on their own. Disconnecting or replacing their fuses (if accessible) during storage, or relying on a battery maintainer to offset the draw, prevents this slow drain from compounding into a battery failure.
What to do instead: Close the service valve at every LP cylinder fully before storage. Inspect the regulator housing for cracking or weathering; regulators older than 7 to 10 years should be replaced before another storage season. Note in your spring checklist to test regulator output pressure before first use a qualified RV technician can verify delivery pressure with a manometer in under 15 minutes.
What Are the Most Expensive Storage-Related Repairs?
Ranked by typical repair cost mechanisms explained in the corresponding mistake sections above.
| Damage Type | Typical Repair Cost | Primary Cause |
| Delamination (wall panel) | $3,000–$15,000+ | Water intrusion via failed roof sealant or slide-out seal |
| Full plumbing rebuild | $1,500–$6,000 | Skipped or incomplete winterization |
| Mold remediation | $1,000–$5,000 | Interior moisture, poor ventilation during storage |
| Rodent wiring damage | $500–$4,000 | Unsealed entry points in agricultural storage areas |
| Roof membrane replacement | $800–$3,500 | Failed seam or membrane tear under Michigan snow load |
| Battery bank replacement | $150–$800 | Discharge-induced sulfation or freeze damage |
Delamination is the worst outcome because it often originates from a sealant failure that costs $15 to prevent. Plumbing failures are the most common expensive outcome. Battery replacement is the most certain consequence of neglect Michigan owners who ignore batteries through a full storage season replace them with near certainty.
RV Storage Mistake Prevention Checklist
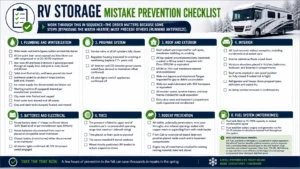
Work through this in sequence the order matters because some steps (bypassing the water heater) must precede others (running antifreeze).
Plumbing and Winterization
- Water heater switched to bypass position and tank fully drained
- All low-point drain valves opened and lines blown out with compressed air at 30–40 PSI maximum
- Non-toxic RV antifreeze (minimum 2 gallons) pumped through all supply lines until pink at every faucet and shower
- Toilet bowl flushed dry, antifreeze poured into bowl
- Antifreeze added to all drain P-traps (kitchen, bath sink, shower)
- Ice maker supply line disconnected and blown out
- Washing machine (if equipped) drained per manufacturer procedure
- City water inlet flushed and capped
- Fresh water tank drained and left empty
- Gray and black tanks dumped, flushed, and treated
Propane System
- Service valve at all LP cylinders fully closed
- Regulator housing inspected for cracking or weathering (replace if 7+ years old)
- LP detector and CO detector power source noted (fuse removal or maintainer offset confirmed)
- All pilot lights and LP appliances confirmed off
Roof and Exterior
- Roof walked and inspected for soft spots, membrane bubbling, or cracking
- All lap sealant around penetrations inspected; cracked or lifting sealant reapplied with Dicor 501LSW or equivalent
- EPDM or TPO roof membrane cleaned and conditioned
- Slide-out toppers and attachment flanges inspected for gap or debris accumulation
- Slide-out seals lubricated with 303 Aerospace or equivalent
- All exterior seams, window frames, and door frames checked for caulk separation
- Entry door seals and basement compartment seals inspected and conditioned
Interior
- All food removed without exception, including condiments and sealed cans
- Interior cabinet surfaces wiped down
- Moisture absorbers placed in kitchen, bathroom, bedroom, and basement compartments
- Roof vents cracked in rain-proof position (or fully closed if rodent risk is high)
- Refrigerator and freezer doors propped open, defrosted and wiped dry
- All damp textiles removed or confirmed dry
Batteries and Electrical
- House battery state of charge confirmed above 12.6V (lead-acid) or per manufacturer spec (lithium)
- House batteries disconnected from coach or placed on compatible smart maintainer
- Chassis battery (motorhomes) either disconnected or on maintainer
- All interior lights confirmed off; 12V disconnect switch engaged
Tires
- Tire pressure inflated to upper end of manufacturer’s recommended operating range (not maximum sidewall rating)
- Tires placed on foam pads or plywood
- Tire covers installed if stored outdoors
- Wheel chocks positioned; RV leveled to reduce suspension stress
Rodent Prevention
- All visible underbelly penetrations, wire pass-throughs, and exhaust openings sealed with copper mesh or expanding foam with mesh backer
- Fresh Cab or essential oil-based deterrent pouches placed inside coach and in basement compartments
- Engine bay of motorhomes checked for existing nesting material; deterrent placed
Fuel System (Motorhomes)
- Fuel tank filled to 90–95% capacity to reduce condensation space
- Fuel stabilizer added; engine and generator run for 10–15 minutes to distribute treated fuel throughout the system
- Note for Michigan owners: E10 fuel (standard in Michigan) is susceptible to phase separation; the ethanol fraction absorbs ambient moisture and can separate into a corrosive water-ethanol layer at the tank bottom. Fuel stabilizer with ethanol treatment (Star Tron, STA-BIL 360 Marine, or equivalent) is more effective in Michigan’s humid storage environment than standard stabilizer alone.
FAQs
What PSI should I use when blowing out RV water lines?
Set your compressor regulator to 30–40 PSI. Below 30 PSI, you won’t fully evacuate water from horizontal runs, traps, and low-lying line segments. Above 40 PSI, you risk blowing out press-fit PEX fittings, damaging the Schrader valve core at the city water inlet, and stressing the pump bypass valve. Blow out each fixture individually with the faucet open, then run antifreeze behind the air to protect residual moisture. These are sequential steps, not alternatives.
How often should I check my RV during winter storage?
Monthly checks are the right interval for most storage situations. Check that moisture absorbers haven’t saturated, confirm no rodent activity at entry points, verify battery state of charge or maintainer function, and visually scan the roof and slideout area for unusual ice accumulation. If storing near agricultural fields in counties like Gratiot, Montcalm, or Isabella, bimonthly visits during November through January peak post-harvest rodent pressure are worth the time.
What should I do if I discover damage in spring?
Don’t operate the water or propane system until the damage is assessed. A cracked fitting that trickles water through a wall for a week before being noticed turns a $200 plumbing repair into a potential mold and substrate problem. Photograph everything before any repair begins; insurers require documentation of damage conditions prior to remediation. Contact a Michigan RV service center in February or March if you suspect issues; April and May are the most backlogged months in the state for RV service, and diagnostic appointments can run 4 to 8 weeks out.
Does RV insurance cover freeze damage or rodent damage?
Typically only under comprehensive coverage, and only if storage-season requirements in your policy are met. Some policies explicitly exclude damage that results from failure to winterize, classifying it as a maintenance failure rather than a covered loss. Rodent damage is covered under most comprehensive policies but subject to deductible. Before storing your RV, confirm with your insurer what your policy covers during long-term storage. Some carriers reduce coverage or require notification for storage periods exceeding 30 days.
Is indoor storage worth the extra cost in Michigan?
Given Michigan’s 170-to-200-day storage season, yes for most owners. The price differential between quality indoor storage and an outdoor lot is typically $40 to $80 per month and $240 to $480 over a storage season. A single roof leak, freeze event, or rodent infestation costs more than that price differential many times over. The break-even point strongly favors indoor storage when you calculate against the risk of any one major failure, not just average-case outcomes.
Should I leave propane in the tanks during storage?
Yes, leave LP cylinders with enough fuel to keep them from going completely empty a completely empty steel cylinder can accumulate interior condensation and begin to rust from the inside. Keep the service valve fully closed. Do not store a cylinder that has been physically damaged, shows surface rust at the collar, or has an expired recertification date (cylinders must be recertified every 12 years in the U.S.).


