

How to Prevent Moisture Damage in Stored RVs
Moisture is the single biggest threat to an RV that isn’t being used. Not rain, not sun, not even freezing temperatures on their own, it’s what happens to the air inside your RV while it sits sealed up for weeks or months at a time.
Here’s the short version: when warm, moist air inside your RV meets a cold surface, a window, a metal frame, a cabinet wall the moisture condenses into water droplets. In an RV you’re actively using, you notice and wipe it away. In an RV sitting in storage, nobody’s there to notice, and that quiet, ongoing condensation is what turns into mold, warped cabinetry, corroded electrical connections, and a musty smell you can’t get rid of.
This guide focuses specifically on preventing damage during rv storage, not winterizing your plumbing, not choosing between indoor and outdoor storage, just the practical, mechanism-based steps that keep moisture from wrecking a stored RV.
Quick Answer
To prevent moisture damage in a stored RV: repair any leaks and check seals before storage see our full RV winterization guide for the complete pre-storage process.”, dry and clean the interior completely, keep relative humidity below 50% using a dehumidifier or desiccants, promote airflow instead of sealing the RV completely, and check on it every 2–4 weeks. The goal is removing the RV’s ability to trap humid air against cold surfaces for months at a time.
Why Stored RVs Are More Vulnerable Than RVs in Use
An RV you’re living in or camping in has moisture and moisture management happening at the same time you’re cooking and showering (adding humidity), but you’re also running vents, fans, and the A/C (removing it). A stored RV loses that second half of the equation. Nobody’s running the exhaust fan. Nobody’s cracking a window after a shower. The RV is sealed up, and whatever humidity is already trapped inside or works its way in through a weak seal has nowhere to go and nothing pulling it back out.
That’s why the fixes for a stored RV are different from the fixes for an RV in daily use. You’re not managing humidity, you’re actively generating. You’re eliminating a static problem: trapped air, cold surfaces, and time.
What Causes Moisture Damage in a Stored RV
Three conditions have to line up for moisture to become damage:
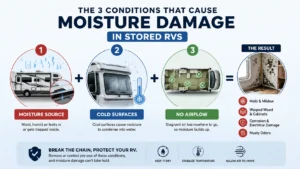
- A source of moisture: humid outside air getting in through a weak seal, residual dampness left behind before storage, or humidity that was already trapped inside when the RV was closed up.
- A cold surface: windows, metal window frames, roof vents, and exterior-facing walls cool faster than the air around them, especially as outside temperatures drop.
- No airflow to remove it: a fully sealed, unventilated RV has no way to exchange that damp air for drier air.
Take away any one of these three, and you interrupt the process before it becomes a problem. That’s the entire logic behind everything below.
Before You Store the RV: A Pre-Storage Moisture Checklist
What you do in the hour before storage matters more than almost anything you do during storage, because it determines how much moisture starts out trapped inside.
- Inspect for leaks first: Check the roof, window seals, cargo bay gaskets, and around any roof penetrations (vents, A/C units, antennas) for cracked or separated sealant. A leak you don’t catch now becomes a constant moisture source for the entire storage period.
- Dry the interior completely: Wipe down all surfaces, including inside cabinets, closets, and under the sink. Pay close attention to the kitchen and bathroom, the two areas most likely to hold residual dampness.
- Remove damp fabrics: Towels, cushion covers, bathmats, and anything else that could hold moisture should come out or go home with you, not stay sealed inside for the winter.
- Run a dehumidifier for a few hours to a few days before closing it up, if you have power access. Starting storage with dry air inside is far easier than trying to dry out already-humid air later.
- Check your holding tanks and drains: Standing water in tanks or P-traps is a hidden moisture and odor source that has nothing to do with the weather outside.
Managing Humidity During Storage
Once the RV is closed up, your job shifts from cleaning to controlling relative humidity, the actual number that determines whether condensation forms.
Know the target number. The EPA recommends keeping indoor relative humidity below 60%, ideally between 30–50%. <cite index=”22-1″>Below 60% relative humidity discourages both mold growth and pests</cite>. A simple digital hygrometer, left inside the RV, is the only way to actually know where you stand instead of guessing.
Choose a moisture-control method that matches your storage setup:
| Storage situation | Best method | Why it fits |
| Powered storage (electrical hookup available) | Portable dehumidifier | Actively pulls moisture from the air across the whole interior; most effective option when power is available |
| Unpowered storage | Desiccants (calcium chloride, silica gel) or a rechargeable dehumidifier | No electricity needed; works well in enclosed sections like cabinets and closets |
| Short-term storage (days to a few weeks) | Ventilation + wipe-down | Lower moisture risk over a short window; airflow alone is often enough |
| All-season storage (months) | Dehumidifier or desiccants plus scheduled check-ins | Extended sealed time means small problems compound if left unchecked |
Don’t seal the RV completely: It feels counterintuitive, but a fully sealed RV traps whatever humidity is already inside with nowhere to go. Cracking a roof vent (with a vent cover to keep out rain and snow) or leaving cabinet and closet doors slightly open lets air circulate instead of stagnating against cold surfaces.
Avoid propane or gas heaters in a stored RV: Burning propane releases water vapor as a byproduct running a gas furnace to keep a stored RV “warm” can actually add more humidity than it removes. If you need heat for battery or plumbing protection, an electric space heater produces far less moisture.
Where Moisture Damage Actually Shows Up
Not every part of an RV is equally at risk, and knowing where to check saves you from a surprise later.
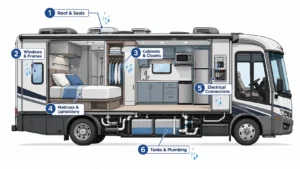
| Component | What moisture does to it | What to check |
| Roof & seals | Cracked sealant lets water in directly; repeated freeze-thaw widens existing gaps | Inspect and reseal before storage; recheck after any major weather |
| Cabinets & closets | Trapped, still air condenses on interior walls, leading to mold and musty odors | Leave doors slightly open; place a desiccant packet inside |
| Mattresses & upholstery | Absorb and hold moisture from below, often unnoticed until mold appears | Prop mattresses up or use a moisture-wicking underlay |
| Windows & metal frames | Cool faster than surrounding air, making them a condensation hotspot | Wipe down during check-ins; confirm seals are intact |
| Electrical connections | Corrode with sustained humidity exposure | Visually inspect during scheduled check-ins |
| Holding tanks & P-traps | Standing water breeds odor and bacteria, unrelated to outside weather | Fully drain and blow out lines before storage |
How Often to Check on a Stored RV
A moisture-prevention plan only works if someone verifies it’s working. Check your RV every 2 to 4 weeks during long-term storage:
- Look and smell for early mold or mildew signs (a musty odor shows up before visible mold does)
- Check the hygrometer reading
- Replace or refill desiccants once they’ve absorbed their capacity
- Confirm any dehumidifier is still running and its collection tank isn’t full
- Wipe down any visible condensation on windows or metal surfaces
Catching a problem at week two is a wipe-down. Catching the same problem at week twelve can be a full interior remediation.
Michigan Winters Make This Harder
Michigan’s humid continental climate means big seasonal humidity swings combined with long stretches of sub-freezing temperatures and that combination is exactly what drives condensation. The wider the gap between a cold exterior surface and the air trapped inside, the more moisture drops out of that air as liquid. An RV stored outdoors and left sealed for a full Michigan winter goes through this cycle repeatedly, every time temperatures swing through a freeze-thaw stretch, which is common through the state’s winter months.
This is where the storage environment itself starts to matter. A consistently climate-stable indoor space keeps the temperature differential small in the first place; there’s less of a gap between inside and outside temperatures for moisture to condense across. That’s a meaningful part of why indoor RV storage in Vestaburg matters heading into a Michigan winter: it doesn’t replace the moisture-control steps above, but it removes one of the three conditions moisture damage depends on before you even walk in the door.
FAQs
Do I need a dehumidifier for RV storage?
Not always it depends on your setup. If you have electrical access, a dehumidifier is the most effective single tool for controlling humidity in a stored RV. Without power, desiccants like calcium chloride or silica gel handle enclosed spaces like cabinets and closets well, though they’re less effective across a whole interior.
Should I leave RV vents and cabinets open during storage?
Yes, generally. Cracking a roof vent (with a vent cover installed) and leaving cabinet and closet doors slightly open allows air to circulate instead of trapping humidity against cold surfaces. The exception is outdoor, uncovered storage in heavy rain or snow, where you’ll want to prioritize keeping precipitation out over airflow.
What humidity level is too high for a stored RV?
Aim to keep relative humidity below 60%, ideally in the 30–50% range. A basic digital hygrometer left inside the RV is the easiest way to track this instead of guessing.
Does indoor storage prevent moisture damage better than outdoor storage?
Indoor storage reduces the temperature swings that drive condensation, which lowers moisture risk overall but it doesn’t eliminate the need for the humidity-control steps above. An RV stored indoors without any moisture management can still develop problems, just more slowly than one stored outdoors.
How do I know if my RV already has moisture damage?
A musty smell is usually the first sign, appearing before visible mold does. Beyond that, check for warped or swollen cabinetry, soft spots in flooring, discoloration on walls or ceilings, and corrosion around electrical connections.


